RSS Feed

Hatch Chili Chicken Mac n Cheese

It’s Hatch chili season and hubs and I went to a cooking class at a local supermarket.  I used to volunteer at the cooking school so I know several of the chefs.  This class was amazing and totally inspired me to use hatch chilies in everything.  So I came up with Hatch Chili Chicken Mac n Cheese!

*Hatch chilies are actually anaheim chilies that are grown in Hatch, NM.  Just a factoid I learned in class and thought I would share.

3 Grilled Chicken Breast

1 lb cooked pasta

3 cups shredded cheese (cheddar or blend)

1/2 cup all-purpose flour

4-8 Hatch Chilies, roasted and chopped (adjust to your palette)

1 onion, small

3 cloves garlic

1 cup bread crumbs

1-2 cups chicken stock

1/2 cup half and half

1/2 stick butter

salt and pepper

Pre-heat oven to 350 degrees.

Grill chicken (seasoned with salt and pepper) and set aside.  Boil pasta according to package.  Saute onion in butter until translucent add garlic and chilies.  Bring chicken stock to a low boil.  Add flour and cook 1-2 minutes.  Toss in cheese and melt.  Add small amount of stock and half and half to loosen the cheese.  Add salt and pepper to taste.

Dice chicken, and toss with pasta and cheese.  Place in a baking dish and cover with bread crumbs.  Bake for 15-20 minutes until bubbly.

Pair your Hatch Mac n Cheese with a fruit salad and enjoy.

What would you put hatch chilies in?

Advertisement

A Finished Quilt!

Woosh I finally finished this quilt from ummm months ago.  I think the completion of this project has brought me out of my blogging hiatus.

It is a quilt for Quilts for Kids that I started with my friend Cara at one of our sewing circles.  I was dreading the finish of this project simply because I didn’t know how to bind a quilt!  Ok on the other side it really wasn’t that hard.  I watched an awesome youTube video from The Crafty Gemini on binding a quilt.  I highly recommend.  My mom was also in town and gave me a few hints from her limited quilting knowledge.

I think I might even make another quilt!  Well after about a million other projects.  In the meantime I hope a little boy or girl who is going through a hard time enjoys this quilt.

Have you ever had a project that just sits in your sewing room starring at you and sometimes makes you feel uncomfortable?  Like hey the longer you wait the more daunting I get?  Well I finally tackled mine and I feel liberated!  On to another project, if I can get away from this Project Runway marathon.

RAD Mama

Graduation Gifts–Finally!

I have been training seven of my lovely volleyball players this summer and now it’s time to say goodbye and send them off to college.  Only one will be returning for her senior year of high school and the others will be spread all over the country at various schools playing volleyball.  I am very excited for each of them and wanted to give them a handmade gift by RAD Mama to remember our year.

Yes there are only six girls in this picture.  One had to miss practice on July 4th for vacation.

Ok back to the gifts.  Three of my girls are going to cold weather locations and I knitted them very cute cowl scarfs.  One was in brown tones with two buttons, one in a blue with yellow color block and a red with sparkles in it.  Unfortunately in my furry of getting all these done I didn’t get any photos of the scarfs.  Maybe they will model for me before they leave!

The other four received cosmetic bags.

I love the way they turned out.  Personalized and vinyl on the inside so when things spill it makes for easier clean up!

Congratulations to my girls and a Happy Graduation to all accomplishing a milestone in life!

RAD Mama


Four Generations in South Dakota

We recently took a trip to South Dakota!  Maybe not on everyone’s must see list but seeing my grandmother on her 98th birthday was the highlight for us.  Now I have never lived in SD but my Dad and most of his side of the family have all had a stint there.  We had 4 generations in the room for my grandmother’s birthday.

After we spent the day celebrating my hubs, baby and I set out to drive across the state to see Mount Rushmore and Custer State Park.  With an almost 8 month old in the car we had to make a few stops and picked the Corn Palace in Mitchell, SD as our first.  Hubs heard about this place from a co-worker and I had no idea what to expect.  It’s actually really interesting and the building is used for community events such as basketball games, high school graduations, and craft shows.

Each year they have a theme and create designs made of corn husks on the outside to represent that theme.  This year happened to be youth sports so of course we had to find the volleyball mural and take a picture.

Next stop was Wall Drug Store in Wall, SD.  Not much else in the town but a street that looks like the old west covered with parked SUVs from all over the country.  We browsed the drug store and I found some inspiration for some new outfits to make for the little one and hubs found the soda shop.  I ordered up some root beer floats from a Slovenian girl behind the counter.  The drug store participates in a work across America program and pretty much everyone working in the shop was from another country.

After enough browsing at all the odds and ends the drug store carried we were ready to drive our last 100 miles or so into Custer State Park.  I think this is the part my hubs had been waiting for since we left Austin.

Our B and B for the evening.

Along the scenic drive through the park.  We weren’t this daring to feed the animals!

Beautiful nature!

The fam at Mount Rushmore.  A wonderful trip across America to see a National Landmark and a 98 year old grandma.

Walking in the Hood

On hub’s first Father’s Day we took a long walk through the neighborhood.  Now it’s about 90 by mid-day and somewhat hilly in our neighborhood so we were all sweating by the end of the hour.  The baby is teething and the walk seemed to calm her down or it might have been the unexpected friends we met along the way.

This was the first time she sat in the jogger like a big girl!

This one seemed a bit startled and was was eying us as we strolled by.

Trying to find anything to eat!

She decided she had seen enough and finally nodded off to dream land.  Don’t worry she has on oodles of sunscreen!

Have a great weekend and get out and enjoy the fresh outdoors.  You never know what you might see in your hood!

RAD Mama

Tutorial–Coasters

I had some extra fabric leftover from my monogram pillows and decided to make some coasters for our living room.  I am sure there are 101 ways to make coasters but here is my simple and fast way I did it.

Scrap fabric

Extra thick double sided interfacing

First I cut 8 squares approximately 5.5 x 5.5 to make 4 coasters.  Also cut 4 squares of interfacing 4 x 4.  You can make them any size but I liked the finished size this created.


Place wrong sides together and sew 3 of the 4 sides together.  Also sew the corners of the 4th side leaving enough room to stuff your interfacing into the pocket.

Turn right side out.  On the open 4th side fold over the seam and press.  I found this much easier to do now as opposed to after I put the interfacing into the pocket.


Stuff 1 interfacing square into each pocket and press.

Topstitch as close as you can get to the edge.  I mitered 2 of the coasters corners and played around a bit.  They don’t all have to match but this is where you can get creative and sew different designs like these.

I did this one in black thread so you could see it better.  Lines aren’t perfect but when there is a glass on top of it you can’t even tell.

Have fun making coasters to use up scraps or match pillows in your home.

RAD Mama

Recipe–Play Date Snack

With all my Costco-ing I am been forced to either freeze items or find/create new recipes to help use up the massive amounts of whatever I buy.  This time it was sour cream.  Hubs loves sour cream pound cake so I have made several in the past but wanted to do something different with the batter.  I turned it into lemon sour cream pound cup cakes with a strawberry jam filling.

I adapted this recipe from Paula Deen’s Sour Cream Pound Cake Recipe.

1 stick butter

1 cup suar

3/4 cup sour cream

1/4 teaspoon baking soda

1 1/2 cups all-purpose flour

3 eggs

1 tablespoon vanilla

1 tablespoon fresh squeezed lemon juice

Preheat oven to 350 degrees.

Throw all your dry ingredients into the mixer and add wet ingredients.  Make sure you don’t over mix otherwise the cake will be a bit tough.  Using a muffin tin fill each cup 1/3 of the way.  Then add a layer of your strawberry jam (recipe below) and finish with the lemon sour cream batter.

Bake about 20-30 mins.  Note: My oven bakes crazy so I usually set my temperature a bit lower and end up having to add minutes and watch and add minutes, etc.

Yields about 12 -15 cupcakes.

Strawberry jam

1 lb fresh strawberries, washed, stems cut off and diced

1/4 cup sugar

1-2 tablespoons water

Simmer all on the stove until forms a jam like consistency.  Also great over ice cream.

So go and start a pot of coffee and have an afternoon snack, perfect for a play date.

Enjoy!

RAD Mama

Baby proofing

The baby is all over the place.  Crawling. Standing.  Contemplating how to climb. Pulling on the blinds.  You get the picture.  So hubs and I decided it was time to baby proof the house.  We installed the traditional plugs in the outlets, under the cabinet locks and collecting items at her level to store somewhere higher.

We have a massive fireplace (175 inches long) in our living room that needed some cushioning as well as our tv stand needed a cover to distract the baby.  This was to become my task.  Design and install some sort of baby proofing yet aesthetically pleasing cushioning.  So here is what I did.

Before

After

Hubs and I decided that we needed more seating and the fireplace was a great option but not with stone sticking you in the rump!  So I made some cushions to add more seating and added a faux tufted cover for the front and side of the fireplace.  The monogramed pillows are great for back support and I really like the monogram.  I have a tutorial for the monogramed pillows here.  I kept the seating cushions neutral so I could change out the pillows with different colors if I pleased and I found it on sale for $4 a yard!

I wanted a cohesive look for the tv stand and knew this was going to be temporary.  My MIL found the tan cushions that provided great cushion on the corners of the stand but we still needed something to cover the glass shelves otherwise this was going to turn into her jungle gym.

Before

After

More faux tufted cushioning that doesn’t look too inviting for baby.  So far so good!

This was a great project because there was no pattern or tutorial.  It is all custom made for our home and I learned a lot about measuring, making piping, attaching velcro to stone and making cushions.  What kind of baby proofing have you had to do?

RAD Mama

Pinned It Did It–Fruit Wash

I have seen this fruit wash several times on Pinterest and my father-in-law actually mentioned it as a helpful hint.  Since he was hip on it I thought I better try it out to see if it actually worked.  So I bought my regular batch of fruit from Costco and brought it home, washed it in a mixture of white vinegar and water.

I believe the suggestion I used was from Food Lush Blog.  I have put it on my Pinned It Did It Pinterest Board which you can follow here.

This wash called for 1 part vinegar (white or apple cider) and 10 parts water.  Well I eyeballed it and here are the results.

After soak in vinegar wash.  I washed the strawberries, blackberries and raspberries in the wash.

5 days later.  Most all of the fruit was in good shape.  The raspberries were better off than without the wash but I think due to their fragile nature they were more mashed than the other fruit.  All in all I would recommend using this technique on your fruit to help extend the life of the summer gems.

RAD Mama


Tutorial–Monogramed Pillow

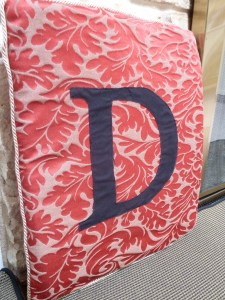
I have been a bit absent from my blog because I have been working on baby proofing our living room.  Since baby proofing doesn’t always have an end result of attractive, I thought I would add some personalized pillows to our fireplace.  Here is my tutorial for a monogramed pillow.
2 pillow forms of your desired size

fabric to cover the forms

contrasting fabric for monogram

pre-made piping (or you can make your own)

double sided web fusible tape

chalk or fabric marker

My pillow forms were 1x15x17 and I cut my fabric a half inch plus 5/8 seam allowance larger than the dimensions.  Cut four of these pieces.

Next I went to Google and searched “D letter” and found oodles of varying scripts of the letter D.  I chose the one I liked and printed it, cut it out and used it as a template.
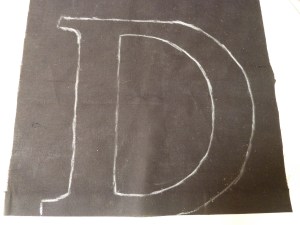
Next trace your letter with chalk on your contrasting fabric.  A fabric marker will work as well but since my fabric was black my marker wouldn’t show up.  Now if you don’t want to deal with the remnant of the chalk dust you can flip your letter over and do the tracing on what would be the back side of your letter.

Cut this out and add some strips of the fusible web by following the package directions.  Try and add your web to the edges of your letter which help when you go to sew it down.  Measure equal distance from top and bottom and side to side for placement of your letter on one front piece of your pillow fabric.  Tack your letter down using the other side of the fusible webbing with your iron.

With a zig zag stitch all edges of your letter onto the pillow fabric.

Place right sides of your fabric (letter should be on the inside) together sandwiching the piping.  Make sure the pretty pipped edge you want to line the pillow is facing inside.  Using your zipper foot or piping foot sew up against the piping.  All raw edges together.  My pillows used about 3 1/2 yards of piping.
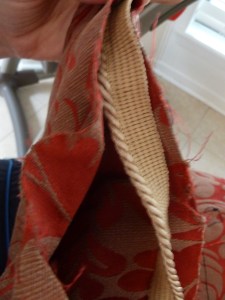
I chose to use strips of piping instead of keeping it a continuous piece since I got several pieces of mine on sale and didn’t have enough for a continuous piece.  If you chose this method make sure you extend your piece of pipping a bit longer than the edge of the fabric and when sewing your seams leave about an inch to place the next piece of piping over the piece just sewn like a plus sign.
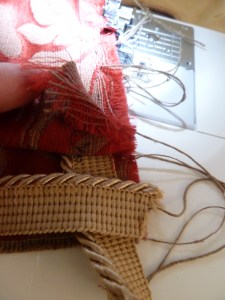
Note–Now you could sew your piping onto one side of your fabric first but that is double work so I chose to do the fast method of sandwiching and sewing.

Pin if you wish.  Sew 3 1/2 sides together leaving (make sure you stop an inch from the edge to place the next piece of piping in the seam) a hole large enough to stuff your pillow into the casing.

Stuff your pillow into your casing and hand stitch the opening close using a blind stitch.  I chose to enclose my pillows so little hands didn’t explore and pull out the foam.  You can put a zipper in or leave an opening in the back.  More on these techniques later.

Done!  Easy!  These are going to work great as back cushions for our fireplace seating.

Now go and personalized some pillows to baby proof or update your home.

RAD Mama