I love wreaths but I feel like they are a staple for the holidays. I usually have one up for Christmas but that is about it so I decided to compose a whole week of wreaths for all kinds of occasions. My first inspiration is from Pinterest. You may have seen this patriotic wreath that has been all over Pinterest. I decided to do my own version of it since it’s Memorial Day and we were having people over to celebrate. Here is how it turned out.
So a confession, I rarely read directions. That means putting together toys, how to fix my blender, how to use any electronic, etc, I don’t read any of them. No difference here on a tutorial for a patriotic wreath. I saw the picture, scrolled down the directions and was off to Hobby Lobby. I really like this project because it doesn’t have to be perfect to turn out.
Now my wreath calls for more than double the felt and I decided to use blue felt with glitter on it along with a pool noodle as the wreath. Here are all the supplies I used:
4 sheets glitter blue felt (HL)
13 sheets red felt (HL)
13 sheets white felt (HL)
duct tape (junk draw)
1 pool noodle (Dollar Stor)
felt stars–pre-cut (JoAnn’s)
2 1/2 boxes size 20- 1 1/4 straight pins (Sew-ology, half off at HL)
scotch tape
22 gauge floral wire (JoAnn’s or any craft store you have a coupon for)
Rotary blade and mat (my craft room)
Wreath hanger (craft closet)
Connect the ends of the noodle and duct tape. May need an extra set of hands to help but sometimes my hubs rolls his eyes at my craft projects (I can even see him thinking “Is this really going to work?”) so I found cutting a couple strips of duct tape first helps. Make sure you tape the noodle up good because the duct tape can tend to slip and trust me after all the time you spend pinning all the 2.2 squares of felt you might go mad if this thing comes a part.
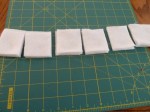
My wreath is 16 inches from top to bottom. Now you are ready to start cutting the massive amount of felt in 2×2 squares.


Since I couldn’t remember all the inspiration instructions I just started pinning my squares on. I folded on a diagonal and then again to form a triangle.
Obviously due to the massive amount of felt I used I pinned them really close together. Pin the entire blue section first which spanned about 6 inches and each red and white section was 3 inches respectively.
Pin away!
Luckily it’s a mindless task, because it does take awhile!
The wreath is almost complete!
Ok so we need some stars. I found some pre-cute red, white and blue stars in the dollar section of JoAnn’s. I snagged a couple of packs and just used 3 white stars. To make the stars 3D I wrapped the wire around two of my fingers and then pulled off and reshaped from an oval to more circular shape. I went back to see what the inspiration blogger used and it was a crayon but I like the no so perfect look and frankly no one can see the wire. I also just scotch tapped the wire to the back of each of the stars. Poke the wire into the noodle and you are done.
Now to hang on the door to welcome our guests! I just used a wreath hanger that I had in the closet.
Some photos from our party.
She had fun playing in the bucket and is even learning to stand up on her own!
Stay tuned all week for other great wreaths!
Happy Memorial Day!
RAD Mama


Oh my word, you are seriously amazing. How much time did this take :D?! But the wreath looks gorge, and your little one is sooo adorbs :)! Can’t wait to see the next project 😉
Thanks Cara. It did take several nap time pinning sessions! Love your blog too. Especially the revamp.
Pingback: Wreath Week–Day 4–Rub-A-Dub-Dub « RAD Mama Designs